环境准备
本人使用的是JDK8、maven3.6.3
maven的setting.xml配置文件需要添加如下配置:
<mirrors>
        <mirror>
            <id>repo.jenkins-ci.org</id>
            <url>https://repo.jenkins-ci.org/public/</url>
            <mirrorOf>m.g.o-public</mirrorOf>
        </mirror>
</mirrors>

<profile>
    <id>jenkins</id>
    <activation>
        <activeByDefault>true</activeByDefault>
    </activation>
    <repositories>
        <repository>
            <id>repo.jenkins-ci.org</id>
            <url>https://repo.jenkins-ci.org/public/</url>
        </repository>
    </repositories>
    <pluginRepositories>
        <pluginRepository>
            <id>repo.jenkins-ci.org</id>
            <url>https://repo.jenkins-ci.org/public/</url>
        </pluginRepository>
    </pluginRepositories>
</profile>
该配置大致意思就是引入jenkins的 镜像仓库地址,方便代码生成时候maven去对应仓库地址下载需要的jar包
插件开发
jenkins插件开发非常简单,框架骨架都是通过maven的模板生产代码,到时候根据需要到对应地方填充我们自己的逻辑即可。
maven生成项目
执行如下命令:
mvn org.apache.maven.plugins:maven-archetype-plugin:2.4:generate -Dfilter=io.jenkins.archetypes: -DarchetypeCatalog=file:///你的archetype-catalog.xml本地路径(archetype-catalog.xml可以百度下载)
该命令通过制定固定的maven插件maven-archetype-plugin版本为2.4,并且手动指定DarchetypeCatalog路径。因为笔者睬过一个坑,不指定maven-archetype-plugin版本的话默认使用的是3以上版本,然后命令执行会报错,手动改为2.4版本并指定DarchetypeCatalog本地路径才得以运行成功。日志如下:
[INFO] Scanning for projects...
    [INFO]
    [INFO] ------------------< org.apache.maven:standalone-pom >-------------------
    [INFO] Building Maven Stub Project (No POM) 1
    [INFO] --------------------------------[ pom ]---------------------------------
    [INFO]
    [INFO] >>> maven-archetype-plugin:2.4:generate (default-cli) > generate-sources @ standalone-pom >>>
    [INFO]
    [INFO] <<< maven-archetype-plugin:2.4:generate (default-cli) < generate-sources @ standalone-pom <<<
    [INFO]
    [INFO]
    [INFO] --- maven-archetype-plugin:2.4:generate (default-cli) @ standalone-pom ---
    [INFO] Generating project in Interactive mode
    [INFO] No archetype defined. Using maven-archetype-quickstart (org.apache.maven.archetypes:maven-archetype-quickstart:1.0)
    Choose archetype:
    1: file:///Users/Documents/archetype-catalog.xml -> io.jenkins.archetypes:empty-plugin (Skeleton of a Jenkins plugin with a POM and an empty source tree.)
    2: file:///Users/Documents/archetype-catalog.xml -> io.jenkins.archetypes:global-configuration-plugin (Skeleton of a Jenkins plugin with a POM and an example piece of global configuration.)
    3: file:///Users/Documents/archetype-catalog.xml -> io.jenkins.archetypes:hello-world-plugin (Skeleton of a Jenkins plugin with a POM and an example build step.)
    Choose a number or apply filter (format: [groupId:]artifactId, case sensitive contains): : **3**
    Choose io.jenkins.archetypes:hello-world-plugin version:
    1: 1.1
    2: 1.2
    Choose a number: 2:** 2**
    Downloading from hello-world-plugin-repo: file:///Users/zhangzhenglong/Documents/io/jenkins/archetypes/hello-world-plugin/1.2/hello-world-plugin-1.2.jar
    Downloading from nexus: http://nexus.dui88.com:8081/nexus/content/groups/public/io/jenkins/archetypes/hello-world-plugin/1.2/hello-world-plugin-1.2.jar
    Downloaded from nexus: http://nexus.dui88.com:8081/nexus/content/groups/public/io/jenkins/archetypes/hello-world-plugin/1.2/hello-world-plugin-1.2.jar (13 kB at 1.3 kB/s)
    Downloading from hello-world-plugin-repo: file:///Users/Documents/io/jenkins/archetypes/hello-world-plugin/1.2/hello-world-plugin-1.2.pom
    Downloading from nexus: http://nexus.dui88.com:8081/nexus/content/groups/public/io/jenkins/archetypes/hello-world-plugin/1.2/hello-world-plugin-1.2.pom
    Downloaded from nexus: http://nexus.dui88.com:8081/nexus/content/groups/public/io/jenkins/archetypes/hello-world-plugin/1.2/hello-world-plugin-1.2.pom (737 B at 135 B/s)
    [INFO] Using property: groupId = unused
    Define value for property 'artifactId': : **buildInformer**
    Define value for property 'version':  1.0-SNAPSHOT: : **1.0.0**
    [INFO] Using property: package = org.jenkinsci.plugins.sample
    Confirm properties configuration:
    groupId: unused
    artifactId: buildInformer
    version: 1.0.0
    package: org.jenkinsci.plugins.sample
     Y: : **y**
    [INFO] ----------------------------------------------------------------------------
    [INFO] Using following parameters for creating project from Archetype: hello-world-plugin:1.2
    [INFO] ----------------------------------------------------------------------------
    [INFO] Parameter: groupId, Value: unused
    [INFO] Parameter: artifactId, Value: buildInformer
    [INFO] Parameter: version, Value: 1.0.0
    [INFO] Parameter: package, Value: org.jenkinsci.plugins.sample
    [INFO] Parameter: packageInPathFormat, Value: org/jenkinsci/plugins/sample
    [INFO] Parameter: package, Value: org.jenkinsci.plugins.sample
    [INFO] Parameter: groupId, Value: unused
    [INFO] Parameter: artifactId, Value: buildInformer
    [INFO] Parameter: version, Value: 1.0.0
    [INFO] project created from Archetype in dir: /Users/Documents/code/jenkins/build-informer/buildInformer
    [INFO] ------------------------------------------------------------------------
    [INFO] BUILD SUCCESS
    [INFO] ------------------------------------------------------------------------
    [INFO] Total time:  01:24 min
    [INFO] Finished at: 2020-10-10T13:50:04+08:00
jenkins提供给了我们五种模板 :
- 空插件(Jenkins插件的框架)
- 全局配置插件(具有POM和全局配置示例的Jenkins插件的框架)
- 全局共享库
- hello-world-plugin(带有POM的Jenkins插件的骨架和一个示例构建步骤)
- 脚本管道
我们选择了第二种。然后就是输入ArtifactId 和创建Maven项目一样GroupId呢这里就不能设置了,再然后呢就是设置 version 指定插锁创建插件的版本,这里还是使用默认的,直接 Enter 就行,最后确认 信息输入 y 回车,最后就生成了一个基本的jenkins插件项目了!
插件项目
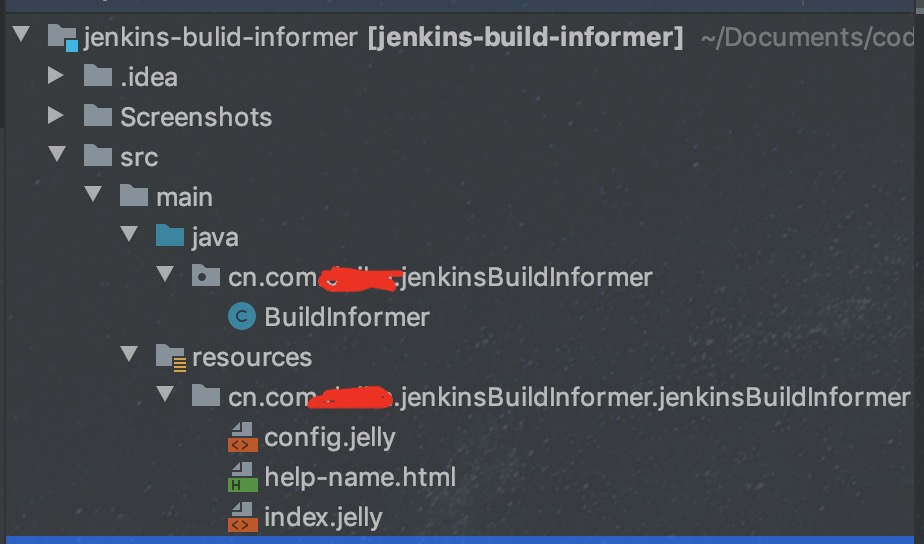
项目目录格式如下:
resources下的目录结构必须要和java下的目录结构一样。例如:src.main.java下有cn.com.xxx.jenkinsBuildInformer 包中有 BuildInformer.java 文件,src/main/resources 下有cn.com.xxx.jenkinsBuildInformer.BuildInformer 目录与之对应,这是Jenkins的规则,如果存在BuildInformer.java就必须存在BuildInformer目录与之对应,目录路径必须同BuildInformer.java包名一致。
然后我们再来看BuildInformer目录,他下面有三类文件,config.jelly、jelly、*.html ,config.jelly就是整个的表单界面。在里面配置你需要的表单内容即可。
我这边写的是一个http的后置通知,可以在打包完成后把打包结果实时通知给调用打包的服务器。避免调用方使用轮训的方法拉取结果。

BuildInformer代码如下:
 /**
 * @author 青葱
 */
public class BuildInformer extends Notifier {

    private final String appName;

    private final String env;

    private final String serverUrl;

    private PrintStream logger;

    /**
     * Fields in config.jelly must names in "DataBoundConstructor"
     */
    @DataBoundConstructor
    public BuildInformer(String appName, String env, String serverUrl) {
        this.appName = appName;
        this.env = env;
        this.serverUrl = serverUrl;
    }

    @Override
    public BuildStepMonitor getRequiredMonitorService() {
        return BuildStepMonitor.NONE;
    }

    @Override
    public boolean perform(AbstractBuild build, Launcher launcher, BuildListener listener) throws UnsupportedEncodingException {

        logger = listener.getLogger();

        Jenkins.getInstance();
        sendAsync(generateMessageURL(build.getResult()));
        return true;
    }

    /**
     * 构建发送通知消息url
     *
     * @return
     */
    private String generateMessageURL(Result result) {
        StringBuffer stringBuffer = new StringBuffer();
        stringBuffer.append(this.serverUrl)
                .append("appName=").append(this.appName)
                .append("&env=").append(this.env)
                .append("result=").append(result.toString());
        return stringBuffer.toString();
    }

    /**
     * 发送消息
     *
     * @param url
     */
    protected void send(String url) {
        logger.println("Sendurl: " + url);
        HttpURLConnection connection = null;
        InputStream is = null;
        String resultData = "";
        try {
            URL targetUrl = new URL(url);
            connection = (HttpURLConnection) targetUrl.openConnection();
            connection.setConnectTimeout(10 * 1000);
            connection.setReadTimeout(10 * 1000);
            connection.connect();
            is = connection.getInputStream();
            InputStreamReader isr = new InputStreamReader(is);
            BufferedReader bufferReader = new BufferedReader(isr);
            String inputLine = "";
            while ((inputLine = bufferReader.readLine()) != null) {
                resultData += inputLine + "\n";
            }
            logger.println("response: " + resultData);
        } catch (Exception e) {
            logger.println("http error." + e);
        } finally {
            if (is != null) {
                try {
                    is.close();
                } catch (IOException e) {
                    e.printStackTrace();
                }
            }
            if (connection != null) {
                connection.disconnect();
            }
        }
        logger.println("Send url finish");
    }

    protected void sendAsync(String url) {
        RequestConfig requestConfig = RequestConfig.custom()
                .setSocketTimeout(100000)
                .setConnectTimeout(100000).build();
        CloseableHttpAsyncClient httpclient = HttpAsyncClients.custom().
                setDefaultRequestConfig(requestConfig)
                .build();
        try {
            httpclient.start();
            final HttpGet request = new HttpGet(url);
            httpclient.execute(request, new FutureCallback<HttpResponse>() {

                @Override
                public void completed(final HttpResponse response) {
                    logger.println(request.getRequestLine() + "->" + response.getStatusLine());
                }

                @Override
                public void failed(final Exception ex) {
                    logger.println(request.getRequestLine() + "->" + ex);
                }

                @Override
                public void cancelled() {
                    logger.println(request.getRequestLine() + " cancelled");
                }
            });
        } catch (Exception e) {
            logger.println("http error." + e);
        } finally {
            try {
                httpclient.close();
            } catch (Exception e) {
            }
        }
        logger.println("send Done");
    }

    @Override
    public DescriptorImpl getDescriptor() {
        return (DescriptorImpl) super.getDescriptor();
    }

    public String getAppName() {
        return appName;
    }

    public String getEnv() {
        return env;
    }

    public String getServerUrl() {
        return serverUrl;
    }

    @Extension
    public static final class DescriptorImpl extends
            BuildStepDescriptor<Publisher> {

        public DescriptorImpl() {
            load();
        }

        private boolean isNumeric(String str) {
            Pattern pattern = Pattern.compile("[0-9]*");
            Matcher isNum = pattern.matcher(str);
            if (!isNum.matches()) {
                return false;
            }
            return true;
        }


        @Override
        public boolean isApplicable(Class<? extends AbstractProject> aClass) {
            return true;
        }

        /**
         * jenkins中显示名称
         *
         * @return
         */
        @Override
        public String getDisplayName() {
            return "构建通知";
        }

        @Override
        public boolean configure(StaplerRequest req, JSONObject formData) throws FormException {
            save();
            return super.configure(req, formData);
        }

    }
}
调试
开发完成执行mvn hpi:run 会打开一个本地的带当前开发插件的jenkins服务器,地址为http://localhost:8080/jenkins,可以在该地址上看插件效果。
如果需要断点调试,可以运行mvnDebug hpi:run,此命令会在8000端口建立监听,然后可以在IDE中配置对应的Run/Debug Configuration,配置完后运行Debug就会自动触发插件编译和运行流程。
上传插件
jenkins如果需要运行该插件,可以登陆jenkins后台,插件管理->高级->上传插件 上传我们打包完成的.hpi包